



Also known as ELW
1988 · Bally
Escape from the Lost World
Known for DINO EGG, Escape Gateway, Bridge of Gold and Upper-left flipper. Volcanic prehistoric landscape, flames and smoke, jagged rock spires and stalagmites and boulders.
- Year
- 1988
- Maker
- Bally
- Type
- Solid state
- Display
- Alphanumeric
- Players
- 4
Known for
- Target
DINO EGG
- doorway
Escape Gateway
- bridge
Bridge of Gold
- extra flipper
Upper-left flipper
- extra flipper
Upper-right flipper
- tunnel
Volcano Tunnel
- path
Mountain
- Goal
Treasure Value
On the playfield
- orange
- red-brown
- teal-blue
- yellow
- 2 flippers
- 3 pop bumpers
- 2 slingshots
Toys 2
- Bridge of Gold bridge
- Skeleton
Ramp 1
- Mystery Path
Shot 1
- Mountain path
Holes 4
- Escape Gateway doorway
- Dinosaur Cave cave
- Right Cave cave
- Volcano Tunnel tunnel
Targets 2
- DINO EGG
- Golden Idol banks
Lanes 2
- Ball Saver lane
- 25K rollovers rollovers
Flippers 2
- Upper-left flipper extra flipper
- Upper-right flipper extra flipper
Post or gate 1
- Escape Gate gate
On the backglass
Who and what
- monster Huge bright green reptilian dinosaur head and upper body, mouth wide open roaring, two rows of long pointed yellow teeth, pale blue bulging eyes with black pupils, ridged green snout with dark nostrils, long clawed forelimbs reaching down, brown boulder balanced on top of its head, brown sack/pot at its left flank
- animal Smaller brown dinosaur at right side, head, neck and long tail visible, standing among fire and smoke
Setting
- Volcanic prehistoric landscape
- Flames and smoke
- Jagged rock spires
- Stalagmites and boulders
Text on it
- ESCAPE FROM THE
- LOST WORLD
How it plays
-
Multiballs 1
- Two-Ball Multiball 2-ball
-
Goals 2
- Treasure Value
- Multiball Release Memory
Made by
- Design
- Dan Langlois
- Art
- Greg Freres
- Software
- Howard Shere
Reference
Linked terms
- DINO EGG also called DINO EGG bank
- Escape Gate also called Escape Gate Timer
- Escape Gateway also called Escape also called Gateway also called Escape Path
- Mystery Path also called Mystery Path ramp
- Golden Idol banks also called Left Golden Idol also called Right Golden Idol also called Golden
- Volcano Tunnel also called Volcano also called Volcano Cave
- Skeleton also called Skeleton switch
- Mountain also called Mountain path
- Ball Saver lane also called Far-left Ball Saver lane
- 25K rollovers also called 25K return rollovers
- Treasure Value also called Treasure Bonus also called Treasure
- Multiball Release Memory also called Multiball Memories also called Memory
Playfield vision analysis
Written by a machine from the photos, so details may be off.
Playfield
- orange
- red-brown
- teal-blue
- yellow
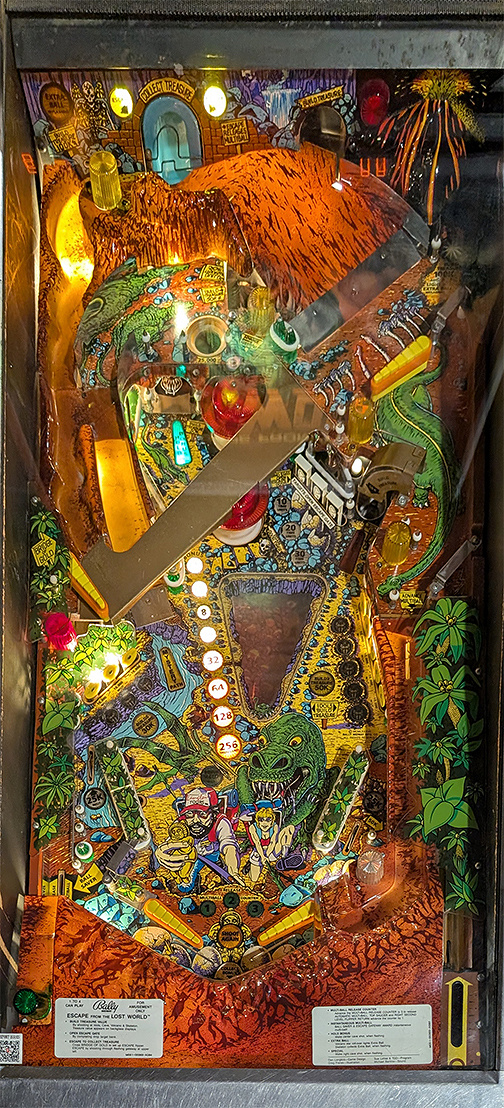
Fingerprint: Escape from the Lost World, huge snarling green reptilian monster head mouth wide open rows of pointed teeth lunging up right side echoed by smaller green reptile head lower right, enormous orange lava-crusted mountain swallowing upper-left half, grinning skull-crossbones face in dark blue hooded robe center flanked by two pith-helmeted explorers tan expedition clothing, dense jungle-ruins layering stone archways temple doors palm fronds firework burst, hand-inked comic style orange-red-brown-teal-yellow
The most memorable element is the huge snarling green reptilian monster head, mouth wide open with rows of pointed teeth, lunging up the right side of the playfield, echoed by a second smaller green reptile head at the lower right. Close behind that is the enormous orange lava-crusted mountain that swallows the whole upper-left half of the field. A grinning skull-and-crossbones face set into a dark blue hooded robe sits dead centre, flanked by two pith-helmeted explorers in tan expedition clothing. The dense jungle-ruins layering - stone archways, temple doors, palm fronds and a bursting firework - packed into every free corner is what makes the art memorable.
Setting
- Volcanic lost-world landscape with erupting orange mountain and lava
- Ancient stone ruins, archway and temple doorway
- Black night sky with a firework burst
- Dense tropical jungle with palm fronds
- Orange-red rocky ground
Symbols
- Skull and crossbones
- Volcano and lava flow
- Firework burst
- Palm trees and jungle fronds
- Stone archway and temple ruin
- Coiled explorers rope
- Circular scoring inserts reading 5, 10 and 50
- Yellow plastic ramp guides and wireform rails
Notable shapes
- Rearing green monster head with gaping fanged mouth dominating the right-centre
- Huge orange lava-crusted volcano filling the upper-left
- Dark blue hooded robe forming a tall shield-like shape down the centre
- Vertical column of three round yellow-bordered inserts (5, 10, 50)
- Angled grey ramp structure cutting across the upper field
Art motifs
- Hand-inked comic linework with heavy black outlines
- Lava speckle and crater texture
- Stone masonry block shading
- Printed white instruction cards riveted to the apron
Themes
- Volcanic adventure
- Lost-world exploration
- Ruins and jungle
- Monster horror
- Archaeology expedition
Title on it
- Escape from the lost world
Text on it
- ESCAPE from the LOST WORLD
- SHOOT FOR THE SPECIAL STAR WHEN LIT FOR ESCAPE FROM THE LOST WORLD
- 5
- 10
- 50
| Kind | Description |
|---|---|
| Creature | Large rearing green reptile head on the right-centre, jaws wide open showing multiple rows of pointed white teeth, snout and brow shaded darker green, clawed forelimb reaching left over the playfield |
| Creature | Smaller second green reptile head with open jaw at the lower right of the apron area |
| Skeleton | Pale grinning human skull with crossbones set at the chest of a dark blue-black hooded robed figure in the centre of the playfield |
| Man | Left-hand explorer, adult male, tan pith helmet, khaki shirt, moustache, holding a coiled rope over one shoulder |
| Man | Right-hand explorer, adult male, tan pith helmet and khaki expedition shirt, standing beside the first explorer near the bottom centre |
| Other | Large white skull-and-crossbones emblem painted on the lower-centre playfield just above the apron's medallion |
A tall portrait pinball playfield in a busy hand-inked comic style, dominated by orange, red-brown, teal-blue and yellow. The top third is a volcanic lost-landscape: a bright orange lava-speckled mountain fills the centre-left, a grey-blue stone archway and temple doorway sit behind it, and the top-right corner is a black night sky lit by a yellow-and-red firework burst. Small gold-lettered banner plaques are embedded in the ruins, one curved over the arch. A grey metal ramp and rails run diagonally across the upper middle, with rounded yellow plastic ramp guides at upper left and mid-right. A rearing green reptilian monster with a gaping fanged mouth occupies the right-centre. The centre of the field is a blue-black hooded figure with a pale grinning skull face. Below that two explorers in pith helmets and khaki shirts stand side by side, one carrying coiled rope, near a painted skull-and-crossbones. A vertical row of round yellow-bordered inserts reads 5, 10 and 50 above three pop bumpers. Green palm fronds frame the lower corners, and two white printed instruction cards are riveted to the orange-red apron.
Backglass vision analysis
Written by a machine from the photos, so details may be off.
Backglass
- orange
- green
- red
- blue
Fingerprint: LOST WORLD with cracked orange stone-like letters, enormous green dinosaur roaring with jaws wide, pale eggs, brown dinosaur in flames.
A gigantic green dinosaur monster head bursting forward out of the centre with its jaws wide open in a roar, teeth bared and bulging eyes, looming over the whole scene. The title LOST WORLD is rendered in enormous cracked, stone-like orange letters spanning the full width of the top. A smaller brown dinosaur stands in flames on the right, next to a large clutch of pale eggs. A boulder is balanced comically on the monster's head.
Setting
- Volcanic prehistoric landscape
- Flames and smoke
- Jagged rock spires
- Stalagmites and boulders
Symbols
- Large pale blue-green eggs
- Rock spires
- Stalagmites
- Boulder
- Flames
Lettering
- Small yellow sans-serif capitals on a banner above an enormous orange-yellow block-serif title with black outline and dark drop shadow, letters overlaid with crack lines; small cursive script maker's logo top-left
Themes
- Prehistoric
- Dinosaur
- Volcano
- Escape
- Adventure
Title on it
- Lost world
Text on it
- ESCAPE FROM THE
- LOST WORLD
| Kind | Description |
|---|---|
| Monster | Huge bright green reptilian dinosaur head and upper body, mouth wide open roaring, two rows of long pointed yellow teeth, pale blue bulging eyes with black pupils, ridged green snout with dark nostrils, long clawed forelimbs reaching down, brown boulder balanced on top of its head, brown sack/pot at its left flank |
| Animal | Smaller brown dinosaur at right side, head, neck and long tail visible, standing among fire and smoke |
Landscape-format painted backglass. Across the top a yellow banner in small caps reads ESCAPE FROM THE, sitting above an enormous orange-and-yellow block-letter title, LOST WORLD, outlined in black with a heavy dark drop shadow; the letters are chipped and cracked with dark crack lines running through them. A small cursive script maker's logo sits in the top-left corner. The centre is dominated by a huge green reptilian monster head and foreleg bursting out of the picture, mouth wide open in a roar showing two rows of long pointed yellow teeth, bulging pale-blue eyes with black pupils, ridged snout and flared nostrils, with a brown rock or boulder balanced on top of its head and a brown sack or pot tucked beside its left side. Long clawed green forelimbs reach down to the bottom edge. Behind it the sky burns orange, red and yellow with flames and smoke; jagged brown rock spires rise on both sides. On the right a large brown prehistoric dinosaur, head and long tail visible, stands amid fire and smoke. Lower right shows a cluster of large pale blue-green eggs among blue-green stalagmites; lower left shows dark blue-green rocks. No score display artwork is visible.